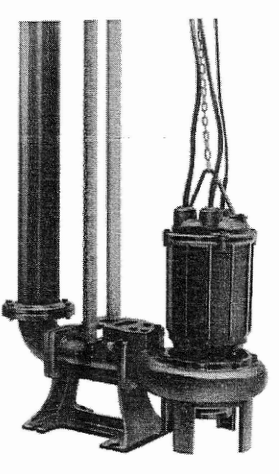
MODEL LS, LM, LL
Safety Information and Introduction
WARNING
Do not work under heavy suspended object unless there is a positive support under it to stop Its fall in event of sling or hoist failure. Disregard of this warning could result in personal injury.
This Quick Discharge Connector should only be serviced by a qualified person or a factory trained person.
CAUTION
This instruction manual includes necessary items for installation, operation and maintenance. Read this manual carefully to ensure correct installation, operation and maintenance.
Read while referring to pump instruction manual. Be sure to keep this instruction manual on hand for future reference.
Design of this EBARAQuick Discharge Connector is based on superior engineering and long experience. To prevent trouble and provide satisfactory operation and long life, it Is Important to understand the EBARAQuick Discharge Connector thoroughly by careful study of this manual. If any questiona arise regarding this manual, please direct them to EBARA CORPORATION.
Specifications
- Check the following paints upon
Receipt of your Quick Discharge Connector:
(1) Check the name plate to confirm that it is the Quick Discharge Connector ordered.
(2) Check that all fastening bolts are properly tightened.
(3) Check that the Quick Discharge Connector has not been damaged.
(4) Check accessories and spare parts against the packing list.
- Precautions when operation is suspended:
(1) For dry storage clean out Quick Discharge Connector and store in a dry place. Follow the in structions under INSTALLATION and OPERATION when Quick Discharge Connector operation is tobe
resumed.
Installation
Quick Discharge Connector Installation:
WARNING
When lifting the Quick Discharge Connector, use appropriate crane (or
hoist) and lift system, check position and tightness of lift system so that weight of the Quick Discharge Connector is not UNBALANCED. Failure to observe this precaution can result serious accidents.
(1) Clean the installation area
(2) Secure the unit horizontally with the anchor bolts. If for some reason, the unit has not been anchored properly, it may tilt and its performance may be impaired. For models LM and LL, join the pump discharge elbow to the unit.
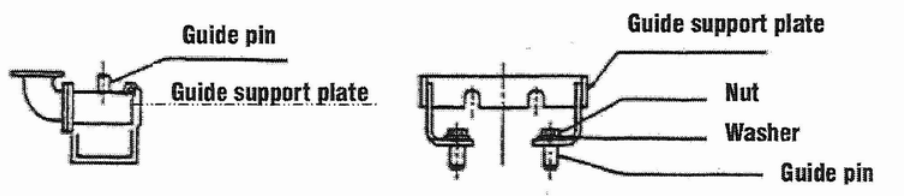
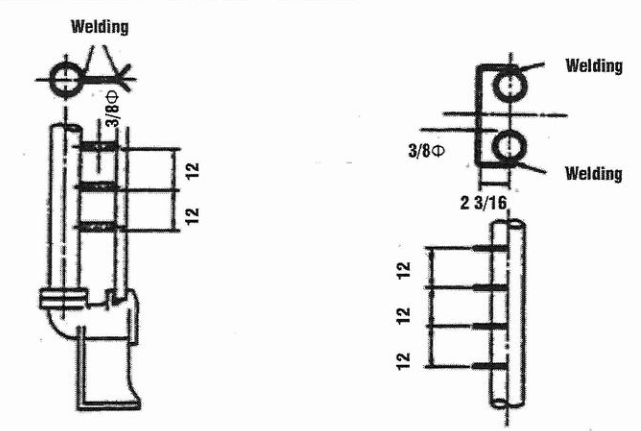
(3) For models LM and U, set accessory guide pins as shown in Fig.1 and 2.
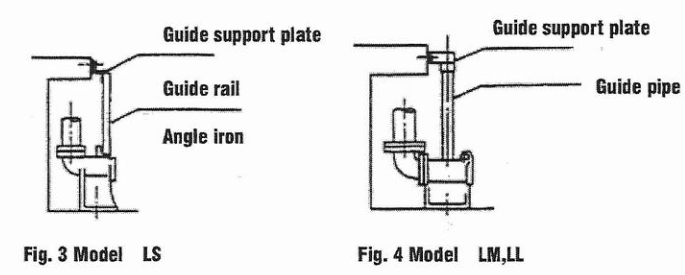
(4) Secure the guide rail or guide pipe, whichever is provided, using guide support plate for vertical aligment (See fig.3,4)
(5) Connect piping to the companion nange which is an accessory to the unit
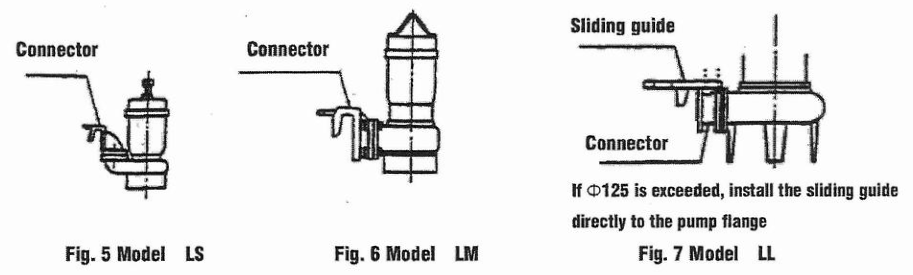
(6) Install the following on the pump, connector, or sliding guide. Refer to Fig. 5,6 and 7.
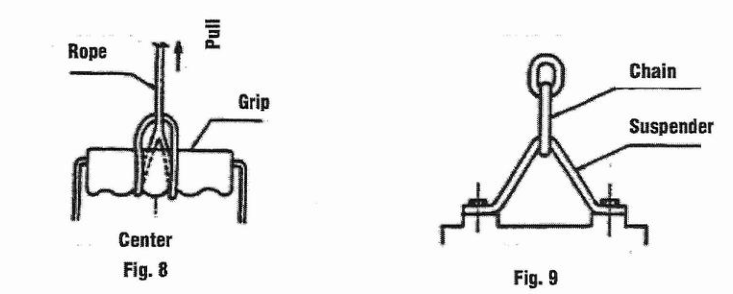
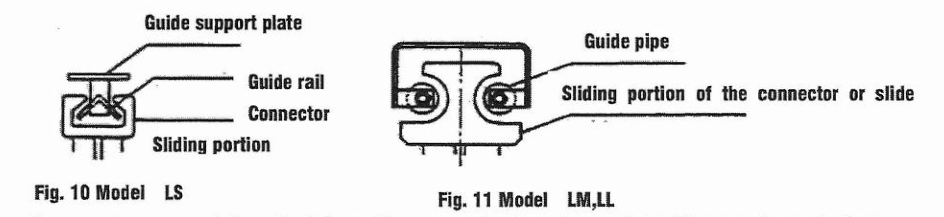
(7) Install suspension rope or chain to pump grip or suspender as shown in Fig. 8 and 9.
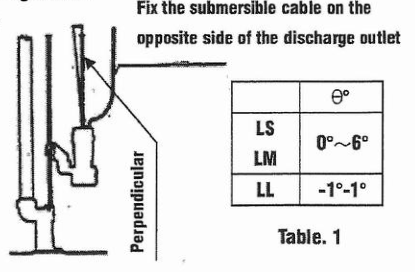
(8) Lift the pump using a chain fall or hoist and insert sliding portion of connector into guide rail (Fig.10) or insert sliding
Portion of connector or sliding guide into guide pipe (Fig. 11).
(9) Keepthe support rope or a chain vertical, lower the pump gradually and set on Quick Discharge Connector body.
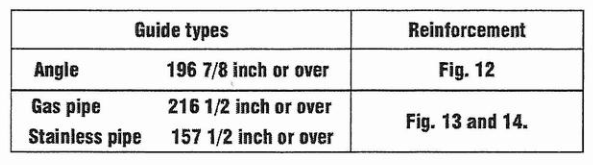
To confirm setting, lift the pump body about 2 inch and lower again two to three times. Ensure that support chain or rope and cables do not interfere with operation. This now completes the installation. During installation, proceed very carefully and take every precaution to prevent the unit and the pump form being dropped. Pump should not be Inclined in excess of values eo shown in the table 1 at right when raising or lowering.
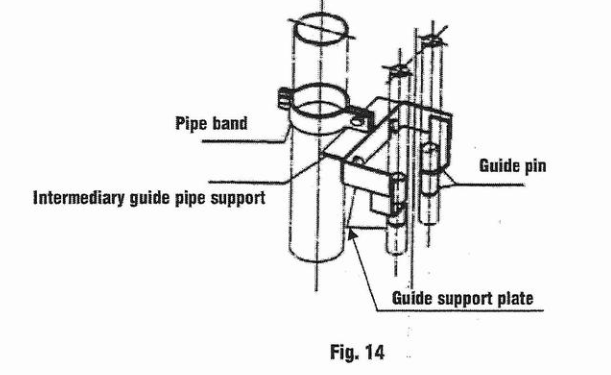
- Reinforcement for guide rail or guide pipe.
(1) Guide rails or guide pipes are strong enough, yet continuous usage may cause them to become flexible and might Interfere with operation of the Quick Discharge Connector. In this event, follow the procedure shown for better security
Also, for models LM and LL, intermediary support as shown in Fig. 14, is available as an optional accessory.
Operation
- Before starting the pump:
(1) When raising the pump for inspection, follow instructions, in steps INSTALLATION1-(8),(9), in that reverse order.
(2) In the event lifting or lowering of the pump along the guide is not possible because the pump catches on something by adherence of foreign matter or a faulty lifting position, avoid pulling the chain or the rope with
excessive force or loosening it.
Charge the lifting position and carefully try to move the equipment to avoid damage.
(3) When lifting or lowering the pump, the motor cable should never be pulled. Proceed carefully so that this cable is
not cut or in any way damaged.
2.Test Operating:
CAUTION Readwhile referring to pump instruction manual.
(1) Upon completion of the pump installation, but before placing the pump in service, start and stop the immersed pump a few times and check for nonnal operation.
(2) There is danger that foreign matter will adhere to flange surface when re-installing the pump. Therefore, when Lowering the pump, start just before installation and stop. Conduct the checks outlined in section (1) and then start nonnal operation.
(3) Always observe the lowest operating water level. If the water ever falls below this level, air will be drawn in and it will no longer be possible for the pump to discharge water.
Maintenance and Service
CAUTION
Refer to the instruction manual accompanying the pump for details on pump maintenance. Normal maintenance should be done by qualified personnel.
Unusual readings may indicate problem requiring immediate service. Contact your local EBARA INTERNATIONAL CORPORATIONrepresentative as soon as possible.
Daily inspection:
Ensure that there is no abnormal vibration noise during actual operation.
Regular inspection:
Every 6 month: Ensurethat the cable and lifting chain are tightly secured and the chain is not corroded.
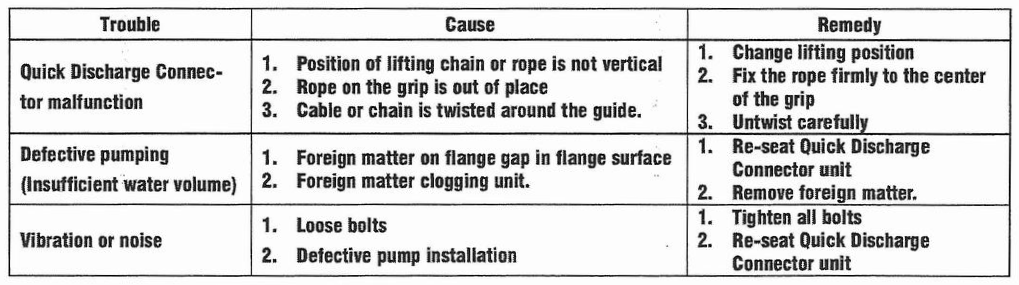
Troubleshooting:
CAUTION
Refer to pump instruction manual for details on pump troubleshooting.
All service should be done by factory trained or qualified personnel only.
Leave a Reply